| g e n u i n e i d e a s | ||||||
 |
 |
 |
 |
 |
 |
 |
| home | art and science |
writings | biography | food | inventions | search |
| tis the seasoning |
|
Oct. 2014, Dec 2020 Sometimes the old ways are best. I love my cast iron pans and pots. I use them so frequently they never have a moment's rest, so they never rust. But in almost every way, they are inferior to stainless and Teflon. If you want to learn why, read on. If you are simply curious about my particular twist on cast iron seasoning, developed after years of experimentation, click here and you can skip the sciency bits. The problem with Cast Iron Cast iron pots are heavy. They can rust. The dark black seasoning will not stand up to hours of simmering if the liquid is acidic, like tomato sauce or sauerkraut. And once the seasoning layer is broached, excess iron can leak out of the pot into your food, risking iron overload disease. Thermal conductivity is eight times lower than copper, which is why cast iron fry pans are notorious for hot spots. The surface is mildly non-stick, but requires a bit of oil or fat to reach its full potential. Cast iron can be cleaned, but not aggressively. And I never use my cast iron pots to cook caramel or make crepes or to scrape off a tasty "fond". A much superior technology is a laminate of durable stainless over an inner copper heat spreading layer, and a second generation Teflon non-stick film bonded to the cooking surface. Eggs slide out with no added fats, and brown uniformly from edge to edge. Burned sugar pops off in an acrid sheet. Home fries crust perfectly and are nearly greaseless. The stainless never rusts and can be scrubbed aggressively. Not to mention lightweight. But Teflon has one Achilles heel- above 400F or so, Teflon breaks down and releases a number of fluorinated organic compounds which are dangerous in small doses. The seasoning on a cast iron pot will also break down at high temps, and while the actual compounds have not been carefully tested for toxicity, they are likely to be no worse than a bit of barbecue smoke. Which is to say toxic, but only in high doses. So I use my cast iron pots on the grill. Under the broiler. Over a fire. For deep frying and steak searing. And every once in a while, when things get out of control, the seasoning pops up or burns off. But the pan is just as easily repaired, and soon as good as new. This is why I took the time to develop a particularly effective seasoning technique. But to understand how this method works, a bit of background on non-stick surfaces is in order. Non-stick Surfaces The simplest non-stick surface is a bit of oil in a pan. Cheap, simple and effective. But we all know food can slip beneath the oil, steam the thin oil coating away, touch the bare pan surface, and stick. Wouldn't it be nice if the pot's surface was somehow made from oil, so it never failed to coat the food? This is the idea behind a "wet" non-stick surface. Over time, the metal's surface builds up a layer of iron oxide and a glassy organic molecule seasoning1 which is oliophilic- that is, wetted by oil. Plus, the surface is typically micro-grooved or porous, so oil wicks under the food, replenishing the layer even in the presence of steam. It's best to keep everything moving and the surface hot, but food has been sliding around on wet oiled surfaces for millennia. These coatings are most commonly seen today on restaurant flat-top grills or inside a wok. If you rub your cast iron pot with a little canola oil and cook with a few tablespoons of bacon fat, the non-stick surface is the oil, not the seasoning.
The problem with wet non-stick surfaces are two-fold. The oil can turn rancid if not used frequently, and the surface is not really suited for stews or low fat cooking. Dry coatings are the obvious alternative, but what material works best? Teflon came to the rescue in the 1950's. Teflon is a long chain molecule of repeating atoms. The center backbone is made from carbon, and the carbon spine is surround by a dense sheath of fluorine atoms. The C:F bond is the single strongest in all of organic chemistry. Which means if a bit of protein from an egg lands on Teflon, the C:F bond will not budge. Plus the fluorine's electrons are fully engaged by the carbon, so they do not reach out and seek a new inorganic dance partner. The real challenge was inventing a "primer" layer so this slippery material would stick to the pot, and not flake off. The first Teflon pans were utterly amazing, despite the potential of toxic fumes. Teflon has the consistency and malleability of Turkish taffy, so the first generation pans were easily nicked or scratched by metal forks and spatulas:
Fortunately, there are other inorganic compound which are also pretty slippery and inert. For example, ceramics like titanium dioxide. These ceramics are very hard, even harder than steel. So a second generation of Teflon coatings hit the market- consisting of fine ceramic powder in a Teflon matrix. A metal spatula skates on the hard ceramic bits, protecting the soft Teflon matrix below. Since both the matrix and the filler are non-stick, even if some of the ceramic bits pop out, the surface remains slippery.
In the last twenty years, people have tried to coat pans entirely with ceramic particles and without the Teflon matrix. Thus avoiding potential toxic fumes, and perhaps operating at higher temperatures. These ceramic pans vary wildly in quality, depending the shape of the ceramic particles, their composition, size distribution, and most importantly, the matrix. A continuous ceramic layer is problematic due to cost and the expansion coefficient mismatch to the underlying metal which will cause cracking, so the particles are alway embedded in a glassy matrix, often using sol gel deposition techniques. The ceramic materials include nanoparticles of titanium dioxides, nitrides, zirconia and so on. Unlike Teflon, this matrix WILL stick to food, which is why the cheaper ceramic coatings with lower ceramic concentrations eventually lose their non-stick properties. Sometimes after their first use....
Seasoned cast-iron pots are a mash-up of all these techniques. In lieu of a highly non-stick organic film like Teflon, a glassy carbon network1 formed by oxidizing and curing oil coats the pan. At low cooking temperatures this seasoning is modestly non-stick, certainly more so than steel. It is also modestly oliophilic, so it is wet by oil, and does a pretty good job staying lubricated. Plus the cast iron bumps stick up through the seasoning, acting like the ceramic beads embedded in high tech coatings. Not bad for a few hundred year old technology. In cross-section, the surface of a cast-iron fry pan consists of tiny (invisible to the naked eye) pores and cracks, and much larger pockets. Both structures contribute to a well-seasoned surface.
After applying curing oil and wiping down the surface, the pores and pockets are filled, but the high points of the surface are nearly wiped bare:
Fortunately, as you probably noticed in a hot frying pan, oil tends to spread out when heated (e.g. the surface tension and viscosity lowers). So, during the curing stage oil crawls out of the pockets and over the surface. If there were no pockets, after wiping down the oiled pan, the surface would barely be covered and the layers would not build up into a tough seasoned film. Seasoning requires pockets! The pores are filled on the FIRST coat, and these pores act like foundation columns, bonding the film to the iron.
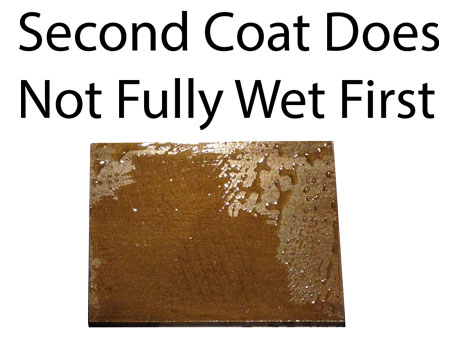
The first cured layer is already a pretty good non-stick film. As you can see in this photo taken on a smooth steel plate, the second application of flax oil pulls back from the first cured layer. You can observe this pull-back on a rough cast-iron surface, if you know what you are looking for:
Just like painting, you might think scuffing or sanding the surface between coats would improve adhesion. So it does, and a matte finish will evenly distribute the oil coating across the surface. But, the abrasive will not reach the bottom of the pockets, so getting the first coat right (and frankly thick enough), is critical. Each subsequent oil application fills the now-shallower pockets, so is less effective at thickening. Given diminishing returns, I usually apply only two additional coats, but some people wipe on eight or more.
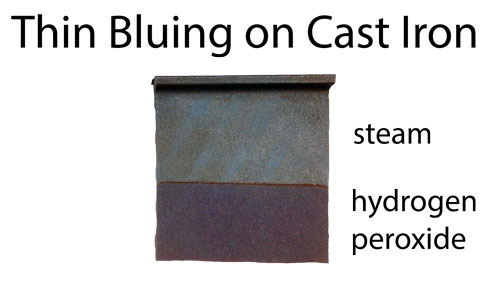
But this is only half the story. You may have noticed the Teflon and ceramic illustrations above included a "primer" layer. This material is engineered to stick to both iron and glass (or iron and Teflon). Otherwise, the native adhesion is poor. It's the same reason why you prime an auto body before painting. Poor surface preparation is the main reason paint falls off shingles, and why cast-iron seasoning fails to perform. There are many iron primers on the market, such as iron phosphate or alkaline baths or those with heavy metals. But some of these are toxic, others not stable at frying temperatures, and most outside the scope of kitchen science. Fortunately, it turns out curing oils stick reasonably well to clean, dry oxidize iron. And iron oxidizes way too easily. It's no surprise, but iron rusts in water or moist air. Iron will rust even on a winter day. This is because very little energy is required to form red rust. Red rust is full of oxygen and moisture and is much less dense than the iron pan (4.25 gms/cc vs 7 gms/cc). So it swells, bulges up and flakes off. Exposing fresh bare iron to air and moisture, until the entire pan is dust. Not a problem with stainless steel, but a potential issue with cast iron cookware. You don't want your perfectly seasoned pan to absorb a bit of moisture, and pry off the seasoning. Fortunately, there are other iron oxides which are moisture resistant. Gun manufacturers protect their barrels by "bluing" the steel and then rubbing with gun oil. Bluing is a thin tenacious iron oxide that is transparent. Like an oil slick on water, bluing creates an optical interference pattern that is iridescent. It forms a "passivating" layer on steel. Secret gunsmith bluing recipes abound, but high pressure steam will suffice:
The problem with bluing is it is only .000005" thick! Easily abraded, and readily attacked by acids or bases. So cast iron pots rely on creating a third kind of iron oxide called "magnetite". This oxide is reasonably water resistant and can grow much thicker than bluing without cracking or flaking. It is modestly resistant to weak acids and bases. Dark black or gray in color. Dry, high temperatures encourage magnetite formation, but it also helps to prepare the iron's oxidative state with an appropriate etch. Which is exactly the process below: Seasoning Recipe There are five steps: Most of these steps should be familiar (e.g. from recipes found on the web or carried by family tradition), but the small differences matter. The key change is the use of a weak chemical etch before seasoning. This etch includes sulfuric acid, so you must be comfortable working with chemicals and know how to do so safely. IF YOU ARE NOT CAPABLE OF WORKING SAFELY AND SMARTLY- DO NOT ATTEMPT! An alternative etch, which is easier to blend and less caustic, can be found in this footnote2. Performance is good, but not quite as effective as the WPE:
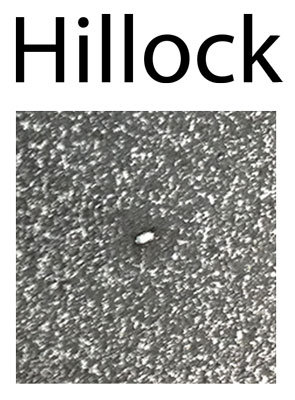
Sand down hillocks: Cast iron is molded inside a compressed sand cavity. A quality manufacturer's sand is uniform and clean, but every once in a while a small hillock results. This bump will divert a spatula, and food will stick in the hillock's shadow. So I like to sand down the cooking surface with 70 grit foam-backed emery cloth, followed by 200 grit. Each sanding will take about 15 minutes by hand, and only needs to be performed the first time you season a new skillet. An old pan bought at a yard sale may already be smooth. And remember, the pockets are necessary as oil reservoirs- a light sanding is all that's required, not a mirror finish.
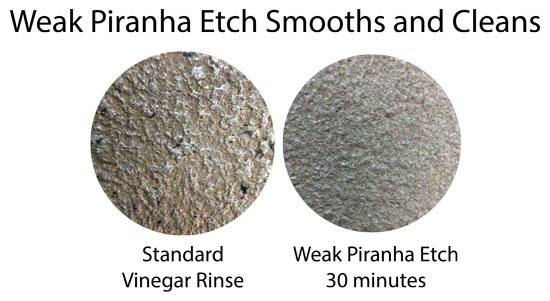
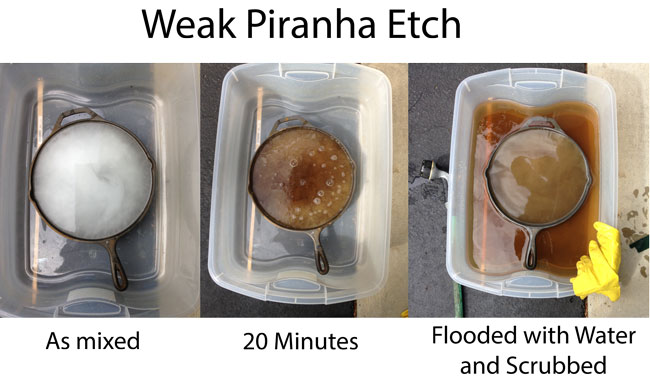
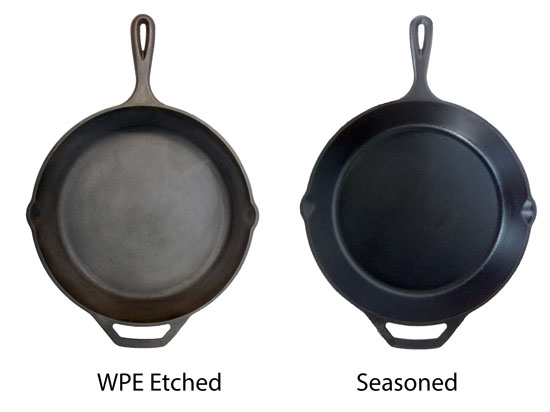
Remove old seasoning with lye: Foaming lye-based oven clean is fine. Wear gloves and goggles- lye is caustic, and you really don't want to breath it in or spray it into your eyes! Liberally apply to both sides of the pan, and place in a sealed plastic container or bag overnight. The next day, wearing gloves and goggles, scour with scotchbrite to remove any residue. Rinse and scour again under very hot water- if any seasoned patches remain, repeat. Clean and stabilize the surface: While many people simple rinse with vinegar to neutralize the lye and clean off any oxides, I have found the surface is never really pristine. The pores are sometimes obscured by burnished metal, leading to poor adhesion. And small bits of black carbon often are trapped in tiny pockets. After trying many alternatives (including electrochemical etching), I settled on a Weak Piranha Etch (WPE). This etch is MODESTLY DANGEROUS AND ALL SAFETY PROCEEDURES MUST BE FOLLOWED. IT IS YOUR RESPONSIBILITY TO WORK SAFELY. USE AT YOUR OWN RISK. WPE not only strips off many organics, it etches the iron grain boundaries, opening up additional pores, and removes excess carbon from the surface. Which helps with magnetite formation, and curing oil adhesion.
For safety and cost, I like to minimize the amount of etchant required. Plus, only the immediate cooking surface demands a pristine interface. So I carefully etch the INTERIOR surface of the pan. Here are the steps
Dry and Pre-bake: Now that the pot is absolutely clean, it is time to dry and stabilize a magnetite surface. Rub the pot down with clean, dry cloth towels. Even though you scrubbed the surface in the etching step, don't be surprised if the cloth turns black. Then, with a hairdryer, dry the surface til it turns light gray and is warm to the touch. Now, place in a hot 500F and bake for 3 hours. Most recipes bake in a warm 250F oven for just an hour, but this hot, long temperature soak has two purposes. First, we will be seasoning at 500F and want to be sure any trapped organics have volatilized completely so they do not weaken the coating. If you harden the seasoning at 500F, you should pre-clean to 500F. Second, the high temperature encourages black magnetite formation over red rust. You may notice a slight reddish tinge in some areas if the hair drying technique was inadequate, a light dusting of rust that rarely causes a problem. Don't sweat it. Seasoning: People swear by everything from grapeseed oil to Crisco to bear grease. We are looking for oils that DRY at 500F, otherwise you are aiming for a WET non-stick surface. Many of these oils are a blend of fatty acids like oleic, stearic, palmitic and linoleic, just in different proportions, so perhaps their similarities are not too surprising. I've tested a number of the most common oils, and concluded tung and flax perform best. Actually, they all work pretty well when greased, but the resistance of these two oils to sticking and delamination on a dry seasoned surface is superior. My test was simple- on a seasoned cast iron plate cleaned of surface oil, I fried a raw egg at 350F until brown. While the egg sticks to the dry seasoning, it falls off when soaked in hot water. The best surfaces showed no sign of damage- the poorer surfaces a bit of pitting or delamination. Both tung and flax seed oils naturally harden in air, and were used as paint bases for centuries. They form a dense, glassy surface which will not go rancid. Other oils, like Crisco, must be heated above their smoking temperature to harden, or they remain tacky. Or char. Despite this, most non-drying oils work just fine as cast-iron seasoning agents. Make sure to buy filtered oils, so tiny bits of suspended organic matter won't ruin the seasoning. And make sure the oils are food safe- e.g., do not contain petroleum products or heavy metal drying agents. The process: Using a wadded up ball of saran wrap, rub your favorite oil into the surface until it glistens (bare cast iron is abrasive, and a cloth or paper towel often strands fibers in the seasoning). Then, with a paper towel DAB off any excess oil- the surface should be "damp", not uniformly glistening. Since the first application is the most critical, and subsequent layers are not as well bonded, my first coat is a bit thicker than most people recommend. After leveling your oven shelf with aluminum foil shims, place the pan cooking side UP in a cold oven. Yes UP, not upside down- again we want the first layer to coat uniformly and be usable even if you did not apply a second or third coat. Heat the oven to 300F for one hour. This helps the oil to creep out uniformly over the surface, and partly dry. Then raise to 500F for an additional three hours. This step cures the oil into a hard film. Remove from the oven and let cool. Using a scotchbrite pad, gently scuff the surf to lower the gloss and improve adhesion. Recoat with oil but this time you can dry off the oiled surface with towel, and bake upside down. This second and third coats smooth out the surface, and catch any areas you might have missed the first time. Again, start in a cold oven, raise to 300F for one hour, then 500F for three hours. The pan will be dark brown/black, slightly bumpy and ready to use.
Seasoning while cooking: As old hands at seasoning know, the pan can deepen the coating, and even repair scratches, just in the normal course of cooking. What happens is the outside of the cast iron gets very hot on the flame- above the smoking point of oil. Even though the oil inside the pot may be at 325F. But *just* at the interface between the oil and the iron, the temperature is high enough to break the oil down and turn it into a dense glassy layer. Cleaning: Talk about passions running high! I won't debate or justify my approach, but I simply wipe the greasy cooking pan out with a paper towel, then lightly scrub with gentle soap and water and a blue scotchbrite- soaking in hot water is fine. Removing old stuck bits is important. If you leave even a tiny nub of food behind, next time it will attract even more char, and soon the pan is ruined. After washing I rub with a little cooking oil (to fill any small nooks and dings), then gently heat on the stove to fully dry, and store til the next use. Rubbing with salt is a poor-man's scotchbrite, and not as effective. Plus the salt will damage iron, as anyone who lives near the ocean knows all too well. This is a case where the new ways are best.
|
|
-------------------------------------------------------------------------------------------------------- 1 Strictly speaking, the hardened oil is not a "polymer". This term is reserved for a long chain molecule built up out of repeated sub units. Instead, the hard brown seasoning is an organic glass, with a random arrangement of atoms - some long chain, some short; some partly oxidized or vulcanized together. I have tried curing various oils in an inert atmosphere to see if oxidation is important. The inert cured films are smoother, clearer and a bit harder, but not dramatically so, and not worth the trouble at home. I also compared raw tung oil to pre-polymerized "stand" oil where the manufacturer partially polymerized the molecules at the factory. While stand oil dried faster in air, after baking to 500F there was no difference in performance. Which is why drying-oils are not significantly better than non-drying once they are baked above their smoke temperature and their molecular chains are disrupted. Pure fatty acids potentially behave differently than blends, and might crystallize more densely. But some (like stearic acid) simply evaporate during baking, leaving the cast iron unseasoned. I also wondered if the oil's sulfur content might play a role in toughness, as it does in vulcanizing rubber. But the results have been inconclusive. In any case, you can't be sure what is in the bottle. Even if the label claims the ingredients are pure flax oil, for example, not all flax oils are the same- the ratio of fatty acids varies depending on whether the oil was extracted by heat, cold pressing, solvents, centrifuge, etc. And the chemical configuration of the fatty acids may change as well- some of the single bonds may convert to double bonds, or hydrogenate, .... Baking oil above its smoke temperature rearranges the chemical bonds, and most of the weak or dangling bonds find a willing partner. No matter how they were processed. So they become less reactive when a bit of egg protein comes around. But not as unreactive as C:F. The film is also slightly porous, allowing moisture and acids and other compounds to diffuse in slightly. If the seasoning is too thin, these compounds will reach the cast iron and may cause delamination from below. Remember, seasoning is a disorganize carbon oxygen film, so will burn like coal in a hot enough fire. Which is why you should respect your cast iron, and not fry much above 350F. But we all do. Cast iron seasoning is not a magical substance. But pretty amazing, given its humble origins. 2 As an alternative to sulfuric acid you can try peracetic acid. Much easier to formulate, and less dangerous. The recipe is simple- mix together equal parts of white vinegar and hydrogen peroxide. Supermarket market white vinegar should be 5% concentration by weight, and drug store hydrogen peroxide, 3% by weight. Make sure to buy fresh hydrogen peroxide. When blended, this ratio forms dilute peracetic acid. When you pour peracetic acid into the cast iron pan, it will start to bubble and turn an orangish red after an hour. Since peracetic acid is weaker than WPE, it will take 3-6 hours to fully clean the metal. After etching, rinse under cold water for a while, pat dry with paper towels and let air dry for a couple of hours. This limits any rusting. You can also form a dark bluing oxide by boiling in water for 15 minutes and wiping off any loose black oxide with a moist towel. Then, follow remaining instructions above, starting at the oven drying step. I'm often asked if there is a "short cut" to seasoning. Well, it's a bit like painting a house- the more time you invest in surface prep, the better the outcome. But, cast iron seasoning is pretty forgiving. Here is quick montage re-seasoning the bottom but not the sides of a frying pan that was burnt on the grill. Simply fill the pan half-way up with lye to remove old seasoning, rinse, then peracetic acid (don't worry that a few areas are still covered with old seasoning), wash off but OK to leave some rust here and there. Boil in water. Dry in oven. At this point you can season as below. Four coats of grapeseed oil instead of flax. The old and new seasoning melded smoothly, and the pan is working out great. Not perfectly black and slick but more than acceptable. Or, and I know this is sacrilege, pour a tsp of oil into the pan, wipe with cloth to even out, heat on a roaring hot gas burner under a venting fan to around 550F and let it oxidize until the smoking stops. Repeat 3-4 times if you prefer a thicker seasoning. You can't season the entire pan this way, but it will restore the inside of the pan in half an hour.
3 Safe acid disposal. Check with local regulations, but in most cases these chemicals can be highly diluted with water (100:1) and safely poured in the kitchen sink. Or you can neutralize by first soaking over limestone chips. Be respectful of draining into watersheds and other protected areas.
|
 Contact Greg Blonder by email here - Modified Genuine Ideas, LLC. |