|
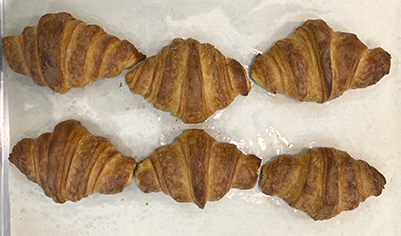
A good croissant is hard to find. Flaky, buttery, with a deep yeasty flavor and warm, oaken color- a proper croissant is transcendent.
Sadly, most restaurant chains and commercial bakeries often inject their dough with palm shortening and conditioners. Which extends shelf life at the cost of manufacturing a greasy, pale, tasteless layered roll. Local bakeries are often no better. Finesse and consistency are an issue- getting time, temperature and humidity right day after day is a challenge.
A competent pastry chef is nearly as hard to find as a great croissant.
But, with a bit of attention to detail you can bake astonishingly flavorful croissant at home. My recipe is organized around time management- start the dough Saturday morning, bake-off on Sunday. Plenty of time to develop a heady yeasty flavor, but the actual prep effort is only about two hours.
Note the recipe is designed to automatically print cleanly on 5 pages. Enjoy!
Makes: 14 croissants and four monkey breads
Total time: Two hour’s effort spread over one day and one morning
Hardware:
- Stand Mixer
- Rolling pin
- Parchment paper
- Pizza cutter
- Bench Scraper
- Pastry brush
- Baking sheets
For the Preferment:
- 1 cup (240 g) 2% or whole milk, room temp or cold from fridge
- 1 tsp. (3 g) active or instant dry yeast (About half a 7 gm packet of yeast)
- 1 ½ cups (180 g) bread flour (King Arthur)
For the Dough:
- 1+ tsp. (4 g) dry yeast (remainder of packet, or a rounded tsp)
- 1 ⅔ cups (200 g) bread flour (King Arthur), plus more as needed
- 3 tbs (40 g) sugar
- 2 tsp. (10 g) table salt
- 2 tbsp. (30 g) unsalted butter, softened
For the Butter Sheet:
- 9 oz (250 g), high-fat unsalted butter (look for European-style brands like Plugra, President, or Kerrygold). Keep in fridge.
- Dusting flour, a few tbs.
For the egg wash:
- 1 large egg yolk
- 3 tbsp. milk or heavy cream
|
Instructions
Make the preferment: (Start at Breakfast: Takes 3 hours or overnight)
- Mix the 3 gms of yeast into the flour in the stand mixer bowl.
- Pour the milk into the preferment flour, squeeze and blend with a plastic spatula until a smooth batter forms, about 2 minutes.
- Cover the bowl with plastic wrap and let the mixture rise until almost doubled in volume, 2½ - 3 hours at room temperature or overnight in the refrigerator.
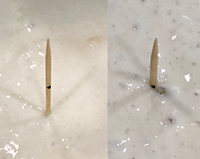
- To confirm the preferment has doubled, stick a toothpick vertically into the batter to measure depth. Then mark the toothpick the same distance above the wet dough line, and reinsert.
Make the dough: (Start at Lunch: Takes 5-6 hours)
- Mix the yeast, sugar, and salt into the flour.
- Attach the mixing bowl containing the preferment to a stand mixer fitted with the dough hook. Raise the speed to medium and mix in about 1/3rd of the flour. While mixing, drop in the softened butter near the hook.
- Slowly add the remaining flour mixture until a loose dough forms, about 2 minutes. Scrape down the sides of the bowl and bring together the ingredients as needed. Mix until the dough is smooth and pulls away from the bowl and hook, 2 minutes more.
- Remove the hook and cover the bowl with a clean, dry kitchen towel. Let rise in a cool place until the volume has increased by around half, about 1½ hours.
- Transfer the dough to a lightly floured work surface and form it into a rough square 9”x9” and about ½ inch thick. Wrap tightly in plastic wrap and refrigerate until chilled thoroughly, 3–4 hours (interior should reach 40F for the dough’s stiffness to match cold butter).
Make the Butter Sheet: (Takes 15 minutes)
- Place a large sheet of parchment paper on a work surface. Cut the butter into ~½” cubes, dust with flour, arrange in a square, then cover with a second sheet.
- Use a rolling pin to bash, flatten and roll the butter into a 8x8 inch x ¼” thick square, peeling back the top sheet to manipulate the butter into shape as needed. A bench scraper can help even out the edges or cut and shift wayward butter.
- Place on a cookie sheet and refrigerate.
|
Laminate the dough: (Start after dinner- takes 2.5 hours)
- Lightly flour a work surface. Unwrap the dough, flour the top surface, then bash and roll out to a 12”x9” rectangle. Square edges matter, use the bench scraper to keep the sides parallel. Roll alternately in both dimensions to avoid rounded corners.

- Always dust off excess flour with a pastry brush or your fingers.
- TURN I: Peel the top sheet away from the butter and flip it over to cover the bottom two-thirds of the rectangle, leaving a half-inch border of dough. Peel away the other sheet. Fold the uncovered third of the dough over the butter, then fold the left-hand third over the center, as if folding a business letter. With your fingers, crimp along the seams on the top and the bottom to seal in the butter.
- TURN II: Give the dough a quarter turn so that the seams are perpendicular to you. Roll out the dough once more into a larger 18H”x12W” rectangle, and fold again in the same manner (no need to pinch the seams again). Wrap in plastic wrap and refrigerate for 1 hour to relax the gluten in the dough and cool the butter.
- TURN III: Clean the work surface, dust again lightly with flour, and retrieve the dough. Unwrap, flour and roll out into a rectangle 18”x12”. Dust off any flour on the dough surface. Fold into thirds so that the rectangle measures 6" x12" inches and ~1½ inches thick.
- Wrap in plastic and refrigerate overnight (or freeze at this stage. When ready, defrost in the fridge overnight before using).
|
Form (Start next day at Breakfast- takes 30 minutes)
Preheat the oven to 400° convection and set the racks at least 4 inches apart. Set a large, wide baking dish filled with hot water on the oven floor or bottom shelf.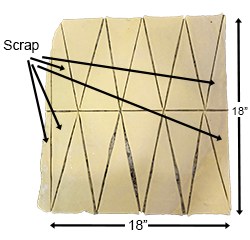
- Line two baking sheets with parchment paper and set aside.
- Lightly dust a work surface with flour and roll dough into an 19”x19” rectangle about 1/8 inch thick. As the dough warms it will become easier to work. Use light dustings of flour as needed to prevent sticking.
- Use a straight edge and pizza cutter (or paring knife) to carefully trim into a 18”x18” square (the rolled-out edges wrap the laminations and will not rise properly). Divide the remaining dough into isoceles triangles, 4½" at the base and 9" tall. These are medium-sized croissants.
- Two notes:
- A floured bench scraper can gently release triangles that stick to the counter.
- Monkey bread: Dust the scraps with brown sugar, arrange in silicone muffin tins, let rise and bake at 350F for a half hour as a treat.
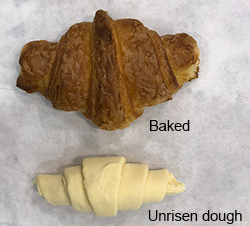
- Working one at a time, starting at the 4½" base, roll each triangle tightly while slightly tugging on the tip to form straight-armed croissant shape. Place on the baking sheets tip-down but slightly visible. Tip up is a "classic" form and the croissants are slightly larger, but might unravel if there is too much dusting flour on the triangle.
 Note: you may freeze uncooked croissants at this stage, then wrap tightly in plastic and foil. Defrost in fridge and continue as below. They rise slightly less than if made as above, but fresh croissants on-demand! Note: you may freeze uncooked croissants at this stage, then wrap tightly in plastic and foil. Defrost in fridge and continue as below. They rise slightly less than if made as above, but fresh croissants on-demand!
- Continue rolling the croissants in this manner, then transfer them, spaced evenly apart and tip-side down on the prepared baking sheets, 7 croissants per baking sheet).
|
Proof and Bake (2-3 hours)
 Place the baking sheets in a warm (75F), preferably humid spot or lightly cover cookie sheet with plastic wrap. A dishwasher with a tray of hot water works fine. Moist air prevents the dough's surface from drying out- the tough skin is an impediment to rising dough. Place the baking sheets in a warm (75F), preferably humid spot or lightly cover cookie sheet with plastic wrap. A dishwasher with a tray of hot water works fine. Moist air prevents the dough's surface from drying out- the tough skin is an impediment to rising dough.
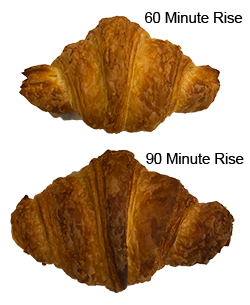
- Let rise until the croissants are puffy and about doubled in size (they should slowly spring back when poked with your fingertip and jiggle slightly like gelatin when the tray is shaken).
- 60–90 minutes rise, but highly dependent on temperature. Keep below 80F or the butter may ooze out. The sides of the cut triangles will round distinctly when fully proofed.
- Optional: In a small bowl, beat the egg yolk and milk or heavy cream. Brush the risen croissants with the mixture just before baking, avoid coating the edges of the dough laminations or they will not rise properly.
 Bake- avoiding the urge to open the oven, until the croissants begin to color, 12-17 minutes. If the color is uneven, rotate the pans and continue cooking until golden, 5-10 more minutes. Any butter that oozes out will be reabsorbed when fully baked. Bake- avoiding the urge to open the oven, until the croissants begin to color, 12-17 minutes. If the color is uneven, rotate the pans and continue cooking until golden, 5-10 more minutes. Any butter that oozes out will be reabsorbed when fully baked.
- Timing highly oven-dependent!
- Remove from parchment and transfer to wire rack. Let cool slightly before serving.
- Seal extra croissants in plastic wrap. May be stored in the fridge for a couple of days. Refresh by reheating at 175F for 5-10 minutes.
|
For “pretzel” style croissants (these are delicious):
- Mix up water and baking soda
- 1 Tsp baking soda (5 gms) to ½ cup (125 gms) water
- With a sprayer, lightly spritz the fully risen croissants with the mixture.
- Let dry for a couple of minutes, then brush on egg/milk wash and sprinkle with kosher salt and sesame seeds.
- Note: about 1:100 people are allergic to sesames. Always good practice when cooking with sesames to make sure its presence in the food is marked by visible seeds on the surface.
- Bake as above.
|
|


