|
April 2011
updated Feb 2017
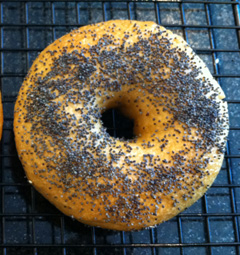
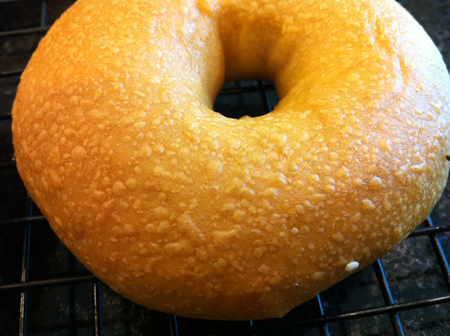
Today’s commercial bagels are a pale and distant cousin of the real thing. A traditional bagel is slightly chewy and dense, with a distinct brown crust, permeated by tiny oval blisters. Commercial bagels are airy and sweet- more gourmet sandwich bread than a working class roll. Compared to the real deal, commercial bagel recipes add sugar, fat and extra water, increasing volume and shelf-life at the cost of flavor and texture. I prefer the original.
These are amazing plain or toasted with butter. You’ll never go back…
To achieve a blistered crust, you must use a high gluten bread flour AND let it rise for 24 hours AND bake in an oven where infra-red light from a hot heating element can reach the bagel. The 24 hours rise not only gives the yeast a chance to slowly build gas bubbles, but converts sugars to alcohol, infusing a sweet boozy aroma into the dough and scenting the kitchen with a heady fragrance.
Makes 8 bagels
Time Span: One entire day (start dough in the morning, rise in the fridge overnight, boil and bake in the morning. The long rising time improves the yeasty flavor of the dough. Actual cooking and prep time around one and a half hours).
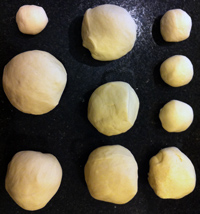 |
Resting dough balls after
Step 4. In this case, six bagels, three bagel "holes" and one tester. |
| |
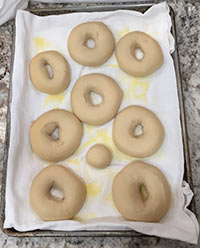 |
| After rising in Step 7 |
Ingredients
- 500 gms (18 oz) bread flour. High gluten bread flour leads to a denser bagel with more blisters, which I prefer.
- 2½ teaspoons table salt (and no less then 1 ½ tsp- here is why salt levels matter)
- 270 gms (~1 ¼ cups) lukewarm water (100 degrees)
- 2 tablespoon barley malt syrup or powder
- 2 teaspoons cake yeast preferred, dry active yeast ok
- topping ingredients like poppy or sesame seeds
- 2-4 tablespoons of baking soda for boiling water
Instructions
- Pre-measure the flour into a bowl. Its important to weigh the flour- a sifted cup of flour weighs 125 gms, a hard-packed cup of flour 145 gms (but, if you don't have a scale, 500 gms is about 4 cups of sifted flour). Also weigh the water.
- Combine yeast, water, salt and malt in the measuring cup, stir vigorously until fully dissolved. The liquid will appear milky. Transfer to the bowl of stand-mixer fitted with dough hook.
- Slowly add flour to liquid; mix at lowest speed until dough starts to cohere. About 3 minutes. The dough should come together on its own. Increase to speed 3 (on a Kitchen Aid stand mixer); continue kneading until dough is smooth, and stiff; approximately another 5-7 minutes. I like to remove the dough after 5-6 total minutes have elapsed to briefly hand knead - sometimes the dough hook only stretches portions of the dough ball- then return to the mixer for another 2-3 minutes. The dough will not be tacky, just silky smooth. If not, knead in a tsp of flour at a time until the texture is correct. (You can knead by hand, but this is a “tight” dough and it takes strength and experience to get it just right.)
- Turn dough onto the counter top and stretch into a long cylinder. Divide into eight portions, about 4 ounces each. Form pieces into smooth balls and cover with lightly oiled plastic wrap to rest for 5 minutes.
- Convert dough balls into bagel rings by pushing thumb through center of the dough, gently expanding into a uniform ring shape (around a 1” hole). Or, if you want to make "bagel holes" for the kids, just form a number of small 1" balls.
-
Place bagels on a lightly-floured smooth cotton cloth in the bottom of a rimed baking sheet. This will prevent sticking better than an oiled baking sheet, though if your dough is stiff enough, oiled parchment paper is fine.
- Let rise at room temperature for an hour. To see if the dough has fully risen, fill large bowl with cool water. Drop a bagel into water; it should float immediately to surface (if not, pat dry, return to baking sheet, and try again ten minutes later). If you don’t want to test on a bagel, you can reserve a half inch dough ball at Step 4 and use that as a dedicated test sample.
- Cover with an inverted baking sheet as a lid. I keep the two sheets aligned with rubber bands. Or cover with oiled plastic wrap. Refrigerate overnight (at least 12 hours; even two days ok. I prefer 24 hours).
- Adjust oven rack to center position and heat oven to 450 degrees (425F in a convection oven, as the higher airflow tends to prematurely dry out and thicken the crust). An oven with an exposed bottom heating element is CRITICAL if you want the skin to be riddled with tiny blisters- here is why infrared matters.
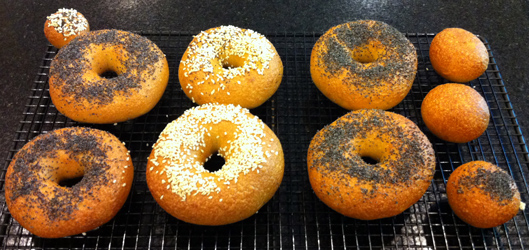
- Fill a large pot (6 qts. or more) two thirds deep with water and stir in the baking soda to increase alkalinity (which helps brown the bagel and promotes a bubbly skin, at this level it won't add flavor); bring to a low boil above a simmer.
- Working two to four at a time, drop the still cold dough rings into boiling water top side down. 45 seconds later, flip over using a Chinese skimmer or slotted spoon for another 45 seconds of boiling. Remove rings from water; transfer to wire rack or a cloth towel, bottom side down, to drain.
- Topping ingredients stick to the bagels best when applied to the dough rings just as they come out of the boiling water. Now is the time to shake them on and lightly press in.
- Transfer to an oiled wire rack with a fine (~1/4" mesh). On a rack, the warm oven air circulates over all sides, resulting in a more uniform crust. But OILED parchment paper on a dark-colored cookie sheet is also fine. Lay the narrow mesh rack or (or cookie sheet) directly on the oven grating.
- Bake until deep golden brown and crisp, about 12-15 minutes. Faster in a convection oven. (Since every oven is different, you might experiment to determine the best cooking time. For example, on your first batch quickly remove two bagels from the oven with tongs at 10, 12, 15 and 17 minutes.)
- Transfer to wire rack to cool. Well, that's what most recipes suggest. But heaven is a warm, fresh bagel slathered with cultured butter, so mine never make it that far. If you prefer cream cheese on a cooled bagel, I find most supermarket cream cheeses too bland. Much tastier if blended 3:1 with a bit of goat cheese.
After fully cooling and tightly wrapped, they can be frozen for a month or more and still taste wonderful toasted.
|


