| g e n u i n e i d e a s | ||||||
 |
 |
 |
 |
 |
 |
 |
| home | art and science |
writings | biography | food | inventions | search |
| trust, but verify |
| Jan 2016 |
|
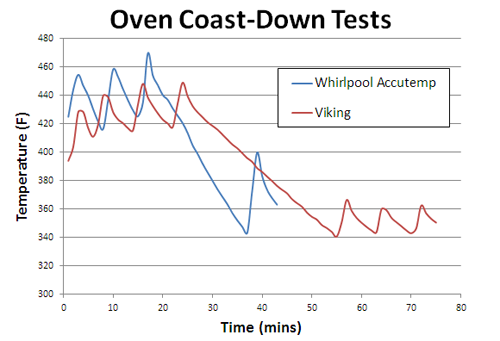
This is a cautionary tale of how recipes fail, traveling from book, to kitchen, to dough, to oven. With a sprinkling of salt along the way: I've tested way too many recipes to be surprised when they don't work out as promised. Why1? Because many were developed by celebrity chefs on commercial ovens with active humidity control, high-speed convection fans and a rotating carousel shelf. The chefs never bothered to adapt their signature recipes to work in a home kitchen oven. Or, because innocuous substitutions of ingredients led to a dramatic failure. By not indicating which ingredients can be adjusted to taste, and which will cause the recipe to implode, the meal was a disaster. An oven is an oven, right? Unfortunately, no. Ovens vary in the most infuriatingly obtuse ways. For example, recipes often call for starting in a hot oven (e.g. to brown), and then to turn down to a lower temperature to finish cooking. Which makes sense. But as you can see, these two kitchen ovens vary by a factor of 2x in cool-down time. Which may lead to under-cooking or over-browning.
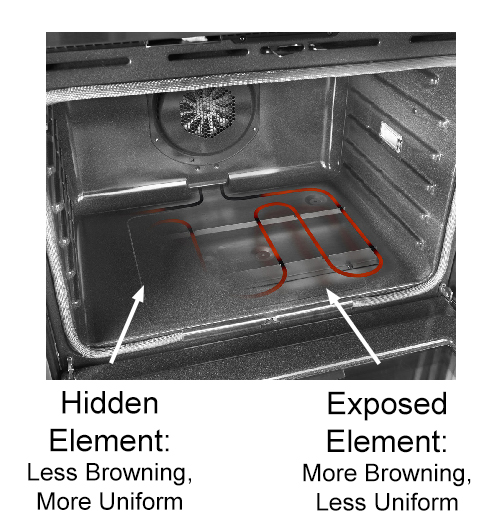
Most ovens are electric, with an exposed U-shaped baking heating element winding around the bottom of the oven cavity, and an exposed heating element for broiling on the top. When either element turns on, it heats to bright red (around 1200F). While it is energized, around 60-80% of the energy in the oven arrives in the form of infra-red (IR) heat. The rest is hot air. This intense radiation will brown any surface it encounters, whether a cookie or a pork loin. And, it will overheat sections of the oven wall, leading to non-uniform cooking, even when de-energized. Convection ovens were developed to improve uniformity by blowing around the oven's hot air. This mixes hot and warm air together, hopefully exposing the food to a constant air temperature averaged across the walls and interior. However, baking consists of a cycle of hot air convection heating, interspersed with direct IR browning. So with or without convection, it's a mix of even and uneven cooking. More recently, some oven manufacturers evolved to a "hidden" baking element located behind the interior walls, forming a heating "plenum" cavity. A fan blows hot air, trapped between the inner and outer wall, against the food. While the interior wall above the heating element is often a hundred degrees or so hotter than the oven temp, it never glows dull red like an exposed heating element.
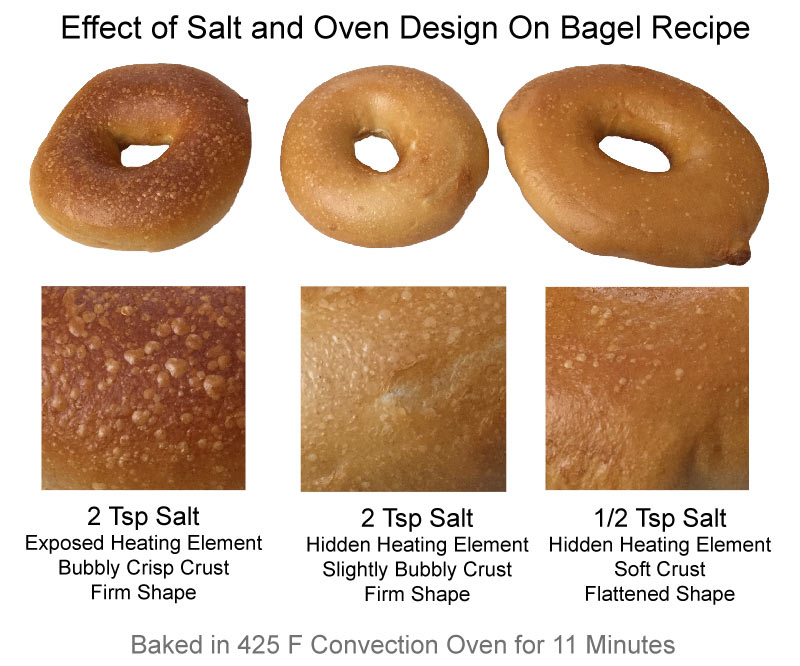
(cut-away view of lower heating element, normally hidden by steel oven surface) This arrangement dramatically improves cooking uniformity at the expense of browning. A recipe tested in an oven with exposed elements will turn out significantly different than one with a hidden element. Yet few cookbooks are either aware of this fact, or bother to suggest work arounds to their readers. For example, in our bagel recipe, a hidden-element produces a softer crust (middle image) with less browning, than an oven with an exposed element (left most image).
In the hidden-element oven, sugar cookies may turn out perfectly, while the same recipe in an exposed-element oven always singes the edges before the center is cooked. You may be able to adjust the balance between convection and IR cooking by arranging the baking shelves appropriately, though modern digitally controlled ovens often are "too smart" for their own good, and will try to defeat your workaround:
But what about salt in the above image? Most bread recipes include some level of salt, presumably for taste. Can you simply adjust the amount of salt to preference (like seasoning soup or adding parsley), or will the recipe fail? It turns out salt adds flavor, but in case of proteins, also changes how much water the protein absorbs, and if the protein remains flexible. Which is why an over-salted meatball is indistinguishable from a hockey puck, but a properly salted steak is moist and juicy. A real-deal bagel is supposed to be a little chewy, so benefits from added salt. As the above photo illustrates, cutting the recipe's salt level from two, to half a teaspoon, results in a wetter dough which sags on rising and produces flat, soft bagels. Errr, flat soft rolls. These aren't bagels. Flour contains many proteins, including a mixture called gluten which is present at the 5-12% level (more in bread flours, less in pastry flours). These glutens are, as you might infer from the name, the glue that holds bread together into an elastic mass. Kneading helps align gluten into elastic sheets that act like a balloon, trapping carbon dioxide gas exhaled by hungry yeast (or from chemical leveners like baking powder). Too little elasticity, and the gas escapes. Too much, and the bread is tough. Metallic ions, such as calcium and magnesium (found in hard or mineral waters), or sodium in table salt, interact with the gluten protein. In particular, they bond to the protein, making it harder for the protein strands to slide past each other. The embedded ionic charges may also attract or repel water molecules, depending on their charge and location within the protein2. Salt will also cause gluten protein to unwind and break apart, then rebond in multiple locations. At low levels (under 2%), salt merely stiffens the gluten matrix. At higher levels, the bread becomes tough and even brittle (remember salt and flour modeling clay in middle school?) Then there is the water's pH. Most tap water is a tiny bit acidic (around pH=6, vs neutral pH=7), just from absorbing atmospheric CO2. Acidic liquids, such as lime juice or lactic acid in sourdough, will not easily penetrate the gluten network, while basic liquids (such as baking soda) flow in quickly. As this video clearly demonstrates, placing a drop of either vinegar, plain tap water, tap water with a bit of baking soda, or tap with 2% salt, makes a huge difference in how completely the "vital gluten" flour (about 85% gluten) hydrates. Diluted vinegar simply floats on the surface: Identical volume for each drop. Starch and gluten swelling strongly dependent on salt and pH content By comparison, even salty, acidic tap water excels at hydrating gluten, and thus requires less time for the batter to rest to reach moisture equilibrium. In bread baking, salt is good. It helps almost any source of water penetrate and hydrate flour. It strengthens the gluten network, so the bread is elastic and full of bubbles. And it brightens the flavor of food. Can you still bake low-salt bread if your water is full of minerals and acidic? Of course you can3. You just need to compensate by increasing dough resting time, the amount of flour, and maybe even throw in a pinch of baking soda to raise the pH. Cooking is science tempered by intuition and experience. Recipes are a snapshot in time, but if the author cannot explain why the recipe works, or reveal its limitations, you will never build your own intuition on a strong foundation.
|
|
-------------------------------------------------------------------------------------------------------- 1 Chefs, with their years of professional experience, may innocently neglect to mention a step they perform automatically every day. For example (as Harold McGee points out), there are subtle flavor differences when the chef cuts, slaps or muddles herbs to extract flavor. The chef may be unaware the flavor profile depends on how the herb is processed, so the details never make it into recipe. But, how they handle a knife, store garlic, or shave a lemon matters. One of many reasons food tastes different in a restaurant than at home. And why apprenticeships are the backbone of restaurant training. 2 NYC has amazing pizza, but the reason is not its hard water. I've measured NYC water hardness at around 120 ppm (0.012%). Which is much higher than say Boston, at 10 ppm. And hard water does effect how flour interacts with water. It dramatically slows how fast water is absorbed by dough. "Hard water", which contains dissolved minerals like calcium or magnesium, creates a strong flour/water surface tension barrier. This is because one species of mineral ions bonds to the flour, and their anchored charge prevents the oppositely signed mobile ions from wandering away. But these are lab experiments designed to illustrate a physical principle, what happens in the real world? First of all, flour itself contains minerals that are highly soluble. Wet dough typically comes in at 1000 ppm of calcium and 300 ppm of Mg. Higher than most hard waters. More importantly, NYC's 0.012% hard water mineral level is SWAMPED by the added salt in dough, typically around 1.5%. Or a hundred times larger. And hard water with 1.5% salt, is quickly absorbed by flour. In any good pizza restaurant, if the water is hard and slow to absorb, the cook would simply adjust by letting the dough rest a bit longer before baking. Or adjust the flour/water ratio. NYC pizza is better because years of experience and rampant competition keeps everyone on their toes. Anyone in the country can match them, if they try hard enough. Wish more did... 3 Many recipes suggest adding salt only after the first rise, concerned too much salt may kill the microbes before they have a chance to reproduce. But this mutes the advantages of salt hydrating the gluten. I've never noticed an issue if the salt is added to the flour, rather than to the water. Nor does it ever seem to bother recipes that pre-rise the yeast in a "sponge" that contains salt. In fact, our experiments prove yeast is highly salt tolerant, and there are good reasons to mix the salt water and yeast together at the start of the recipe. |
 Contact Greg Blonder by email here - Modified Genuine Ideas, LLC. |