| g e n u i n e i d e a s | ||||||
 |
 |
 |
 |
 |
 |
 |
| home | art and science |
writings | biography | food | inventions | search |
| water water everywhere |
|
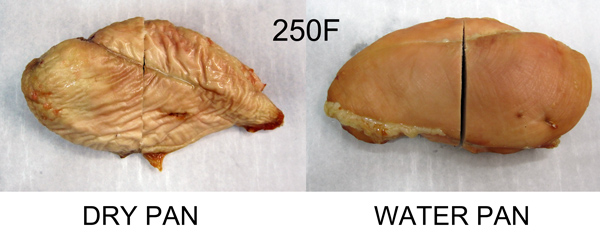
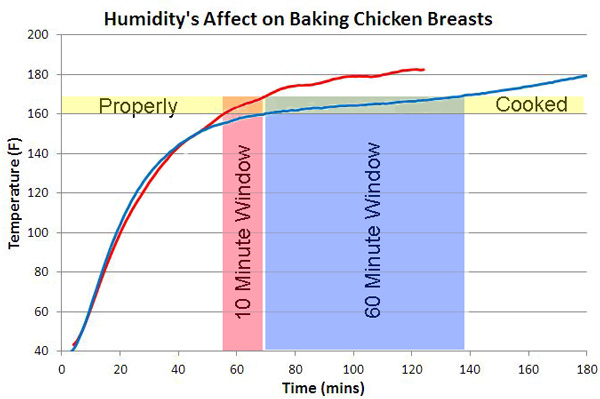
October 2011 Most cooks imagine slow and low cooking is synonymous with moist and tender. But think about this assertion for a minute-- slow and low is exactly the way mankind has dried out and preserved food for millennia, for everything from beef jerky to smoked fish to dried fruit. The key to moist and tender is not a matter of slow cooking at low temperatures, but retaining moisture INSIDE the meat during the cooking process. Once its gone, its gone, and can only be partly replaced by absorbing a final sauce or glaze into a less tender matrix. There are two ways to keep food moist- fast cooking or slow cooking in a humid environment. Let's start with cooking in a humid environment. Food driers are designed to minimize humidity- by distributing moist food between stacked shelves and by forcing dry air over the food, so its internal moisture will evaporate quickly away. In humid cooking, we intentionally add water vapor to the oven, preventing rapid drying, and slowing the cooking process. The set-up is simple, but critical to get right. Simply placing a tiny bowl of water in the back of a conventional oven is insufficient to make a difference. Nor does spritzing a bit of water into through the oven door significantly raise humidity levels, nor will placing a tray of water on the top-most shelf1. In order to significantly affect cooking behavior, a large water tray (in this case, a baking sheet holding 48 oz. of warm water that is nearly as large as the oven shelf), is placed on the bottom shelf IMMEDIATELY above the electric heating element. Then you switch on the oven and wait an hour for the water and humidity levels to stabilize- it takes a while for the water to come up to temperature in a 250F oven. How can you measure the humidity level? We use an old but reliable method- the "wet bulb" technique. Basically, you measure the oven's temperature with a dry thermometer suspended in air, and then a thermometer with the bulb wrapped in a wet cloth. The wet bulb will drop to a lower temperature than the dry bulb because of evaporative cooling (think a moist bandana on a hot dry day). Then, you look up the humidity level on a complex and dense psychrometric nomogram. Instead of a wet cloth we use a wet sponge, and we measure temperatures with a digital thermocouple. This graph illustrates how a wet sponge above the water tray (the solid blue curve) is about 15F warmer than a sponge in the normal, dry oven (the solid red curve). It's warmer because the greater humidity level makes it harder to evaporatively cool- just like its harder to cool off by sweating on a humid vs a dry day. The dotted lines measure the dry bulb temperature of the oven. Note how most electric ovens cycle on and off a few times an hour, and how the water tray effectively damps out some of these fluctuations. Around 140 minutes the sponge began drying out in the humid oven, and its temperature climbed to match the oven's dry bulb level. When you run these numbers through the psychrometric chart, it calculates the humidity ratio as around 10%- that is, measured by weight, 18% of the air in the oven is water vapor. This is actually quite high- on a 100F day with 70% relative humidity, the humidity ratio is under 3%. The effect of extra humidity can be dramatic. In further tests, an 8 oz. chicken breast (never frozen, no "retained water" injected by the poultry processor) was baked in the middle of a 250F oven- either 2" above a dry baking pan, or 2" above the same pan filled with water. For purposes of accentuating the effect, I cooked both breasts to 180F- normally, chicken breasts are optimally cooked between 160F and 170F (and, while the FDA might differ slightly, I usually stop cooking at 155F and let the breast's internal heat "carry over" to 160F). But this is the end point for way too many cooks. In any case, as you can see from the curve below, the normal oven breast cooks much faster than the breast cooked over a humid water tray. In fact, while the normal oven breast did not "stall" and rose continuously to 180F, the extra humidity inhibited the evaporative cooling effect of moisture released from within the breast, allowing it to plateau in temperature. The moist condition dramatically affect the breast's physical appearance. Not to mention moistness.
In addition to visual and textural improvements, humid ovens make it easier to easily time when a chicken breast is optimally cooked. The beginnings of a "stall" in the humid oven greatly extends the window for a properly cooked breast (the yellow rectangular band below). Note how a breast in the normal oven passes through the 160-170F optimally "done" range during a brief 10 minute period. Compared to a 60 minute window when baked over a water tray. When phone rings just as you are ready to plate, and you can't seem to coordinate the timing of dinner, wouldn't you prefer the safety margin of an hour? Or do you prefer your chicken rubbery?
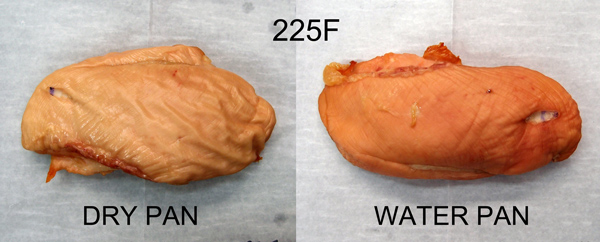
Of course, you should pull the chicken from the oven as soon as it reaches 160F- humid or not, the longer it stays in the oven, the drier the meat. But, with additional time, it also develops a bit more flavor and tenderizes. So the larger window represents an opportunity for the cook to experiment, rather than a rigid timeclock. Humidity matters most in the range below 250F. For example, cooking at 225F dramatically slows both the dry and humid baking rates significantly. Note the time axis is HOURS not MINUTES. If a barbecue recipe calls for 235F rather than 225F, pay attention! And make sure your oven is well calibrated. The extra humidity initially speeds up cooking- below 130F, few juices emerge from meat, so there is little evaporative cooling. But, in a humid oven hot water vapor is condensing on the cooler meat, liberating the heat of condensation as it converts from the gas to the liquid phase. So the humid oven cooks faster. Eventually, however, the humid oven delays the cooking process. Juices start flowing and evaporatively cooling the breast, but chicken breasts are not all that moist. So the dry oven breast powers through the stall and keeps on warming. But, the breast in the humid oven evaporates what little moisture it has more slowly, because the humid air
Even when you don't overcook, humidity makes a difference. In this photo, the breasts were both removed at 165F.
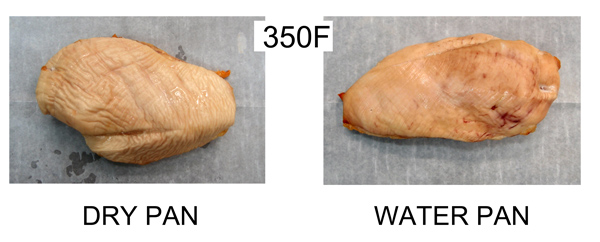
The alternative to cooking in a humid oven is fast cooking- that is, baking so quickly, internal moisture does not have time to migrate to the surface and evaporate. Obviously, this technique works best on medium thick pieces of meat-- thick enough to retain moisture, but not so thick, when the outside is cooked, the inside is still raw. Here we compare two chicken breasts cooked at 350F, one in a conventional oven, and one in a very humid oven above a water tray. Unlike the lower temperature experiment, they cooked at the same pace to nearly 160F. Whether humid or dry, the oven is so hot moisture cannot leave the meat fast enough to aid in evaporative cooling. And both breasts lost about the same amount of weight- 25% post cooking (vs 20% at 250F).
While this photo indicates the "dry pan" breast is slightly more parched, had it been removed at 160F (rather than 180F) the meat would be fine. Again, the water pan provides a bit of margin, but not extra moisture if you over cook. Which is why every Thanksgiving cooking a large turkey at high temperatures can be problematic2. Were it not for the traditional aesthetics of a proud golden bird perched in the center of the family dinner table, your guests would be much better served if you butterflied the bird before cooking. In fact, one of the simplest and moistest roast chicken recipes is courtesy of Jacques Pepin. He first butterflys the chicken and places it bone-side down into a cast iron pan on the stove top. This cooks the bottom side by direct conduction. Then he places the pan in a hot oven for 30 minutes- cooking by radiation and convection. The result? Nearly perfect, moist, tender and flavorful chicken in under an hour. Formidable! So why cook slow, low and moist?
|
|
--------------------------------------------------------------------------------------------------------
1Maintaining an 18% humidity ratio can be a challenge. A typical kitchen oven is about 4 cu. ft. in volume. Air weighs 0.056 lbs/cu. ft. at 250F, so there is about a quarter pound of air in the oven. With a humidity ratio of 18%, that's half an ounce of water. Which sounds easy to just "spritz in", but the oven also exchanges air with the kitchen at a rate of about 5-10 times an hour. Which mean you have to supply nearly half a pound of water every hour. Which is why you need to place a large tray with lots of surface area just above the heating elements, or buy a commercial system (often called a combi oven) which sprays in steam or heats a water bath on-demand. Outdoor smokers are even more challenging, as they often exchange air 50-100 times an hour. Imagine having to add 5 lbs of water an hour to a water tray! Few grills or smokers are properly designed to successfully (and significantly) raise the internal moisture level. More details in a later article.
2 At Thanksgiving, many people suggest cooking the bird breast-side down in a roasting pan so the oozing juices baste the more delicate white meat, while the dark meat gets a head start cooking. Generally, white meat is moist, tender and flavorful at 160F, while the dark meat requires a higher temperature (say 175F) to break down collagen and eliminate certain metallic flavors. Three quarters of the way through cooking, flip the bird and let the skin crisp. However, this technique is wrong on both the principles and on the execution. If the dark meat is down half the time and up half the time, it really cooks no faster than the white meat. So it needs to be cooked in the up position for the majority of the time, but exactly how long will your bird take to cook, so you can predict the 3/4 point? If mistimed, the skin never renders, crisps or darkens. More importantly, its not the basting which cools the meat, but rather the lower temperature environment surrounding the roasting pan due to evaporative cooling of the vegetables and water bath. And the amount of evaporative cooling depends on the depth of the pan, and the position of the bird. This graphic summarizes the main results from a test in a 325F oven. At this temperature, evaporative cooling stalls the water temperature at 175F. Amazingly, in a 1" high wall roasting pan with 1/2" of liquid, evaporating moisture creates a local environment of 235F- almost 100F cooler than the oven. But 3" above the liquid, the temperature is almost back at 325F. Which means if you placed an inverted bird on a rack an inch above the water tray, only the top of the breast is cooled- while the sides of the breasts are running hot. A more gentle gradient is possible in a deep pan with high walls. Now the temperature is only 275F 2" above the water- 50F lower than the oven. But this is without the blocking effect of the turkey. Adding in the turkey 2-3" above the water, it creates a little sauna of high humidity and low temperature.
So here is what I suggest if you want to try this method for cooking turkey: Add 1/2" to 1" of water into a deep roasting pan, placing the turkey breast side down on a rack that suspends it an inch above the liquid. For a 15 lb. bird, cook for an hour to give the dark meat a head start (more for a larger bird, less for a smaller). Then- VERY CAREFULLY, remove the bird, flip breast-side up, and transfer to a rack that sits 2" above the top lip of a water tray (most ovens offer little head-room with a big bird, so you may need to switch to a shallow pan.) This way the skin will crisp on all sides. Using an accurate digital thermometer, keep monitoring the breast and dark meat temps- foil as necessary if the breast starts running ahead. Pull out when the breast is at 155F and the dark meat at 170F, and let it rest and carry over to 160/175F. Or, try one of these two turkey recipes instead- tried, true and nearly foolproof.
|
 Contact Greg Blonder by email here - Modified Genuine Ideas, LLC. |


